Showing posts with label Natural Renovation. Show all posts

Friday, July 20, 2012

A Yard and a Garden

Our house in suburbia :)
We live in a city of approximately 275,000 people. We live in a neighborhood that is an older established "subdivision" but suburban for sure.  From our backyard, we can see six houses (just those that touch our property or at a corner).  All our neighbors are quite nice, but sometimes you just want a little more "boundary."  We have a lovely chain link fence which keeps the dogs out and the kids in. 

Just last week, we visited some of Pete's cousin's in Vancouver - what a lovely place!  His cousin R & Y have the most beautiful (albeit small) urban yard (garden really) that I have seen by someone who is still working full time LOL! Sanctuary, oasis, cozy... Those are just some of the words that describe their little back yard.  So I come home inspired to develop our yard into a little oasis as well.

However, do not fear - there are still high ambitions for the urban homestead! I'm trying to blend homesteading with landscaping with frugality.  Here's what I've come up with so far...

1. We need some bushes or something for a visual barrier in the back of the yard.  In poking around google, I found some blueberry bushes that can be grown as a hedge.  It will take five years to get them to full height, but they should produce some berries even after the first year.  I love the idea of growing blueberries.  They are so healthy and can be frozen or dehydrated to keep for a while.

2. Creative shade plans.  If we can find some clumping (not hyper-grow-all-over-your-yard runners) bamboo that is affordable, we can plant that on the side of the yard.  It would be pretty beautiful (R & Y have some black bamboo in their yard). Shameless beauty.  Added serenity.

3. Dirt for free.  I need to exercise more. I need dirt for my garden projects.  We have dirt underneath our house.  Yup, that's the plan.  As long as I don't dig close to the foundation, I can dig out some dirt for my garden.  Random, I know, but super frugal.

There you go, the first three items on the list of frugal-serene-oasis-yard-garden.

Other ideas for creating a sanctuary/homestead includes eliminating (or at least greatly reducing) the quantity of plastic toys out there.  Seriously, if I'm all about this natural stuff, our kids should be playing with sticks and dirt. Hmmmm, I kinda like that idea.


Love, Carra

Tuesday, July 3, 2012

Painting Plans and Ponderings

So here's my wacky little faith in front of the Marmoleum display at the Common Ground Building Supply.

It is a great little shop in Durham, NC.  All of our Mythic junk-free paint has come from there.  I love that there are so many colors available even in the natural stuff.

Right now, Pete and I are contemplating two big renovations. One is the painting of his office.  It is wood panel walls and very dark.  I spend a lot of time in there too (I'm actually sitting in his office right now balancing the laptop on my knees) especially when we're talking about ministry plans and strategies.

It is an interesting dilemma - where I should land for my office-y stuff.  It seems the location is a bigger reflection of my crazy life.  I'm cooking, schooling, gardening (sort of), naturalizing, etc. a big chunk of my life.  And I'm emailing, balancing, budgeting, strategic thinking, and planning another big chunk of my life.  When fall semester rolls back around (and it's coming quickly), I'll be regularly on campus again... so there's another chunk of my life.  My life is very mingled.  My head is mingled as well.  Where will I end up as my "base"?  I guess I'll see how nice the paint job turns out LOL!

Love, Carra

Friday, September 30, 2011

My New Kitchen!!!

It's finally here!  So I love to watch the makeover shows like on HGTV.  One thing they don't show you is how long it takes to do the last pieces and CLEAN UP!  Crazy!  I cleaned and cleaned and cleaned to make sure all the renovations could shine.  Well, I have to say now that I have taken the photos, I can get back to way we "really" live LOL!

Just a quick rundown of the kitchen makeover.  The before pictures show a number of older appliances.  The only appliance we bought brand new was the dishwasher.  The stove was a used one, the fridge was used and there's a confession coming up about that!


Summary of changes (almost all was done by Pete):
  • Moved refrigerator over to the opposite wall (plumbing: moving the water over for ice maker)
  • Moved tall cabinet from the wall where the fridge would be placed to the opposite wall.  (switch-a-roo) This was tough because the cabinets were installed with nails, not screws.  big nails.  Big nails that we had to use a chisel to get to each nail head to pry it out with a crow bar (there were 18 nails in that cabinet!).
  • Built open shelves where the fridge used to be.
  • Added random miss-matched cabinets (some from my mom's work, some from Habitat restore, some re-purposed from other areas)
  • Pete built the largest cabinet (the peninsula one at the end from scratch)
  • Widened the doorway to the pantry for more access and light
  • Added cabinet above fridge which was actually a combination of two shorter cabinets that Pete connected and added trim to make look like one single cabinet.
  • Built doors for the cabinets that didn't have them or that didn't match the rest of the kitchen.  I think he built maybe 8 new doors?
  • Chipped off the grayish tile backsplash.
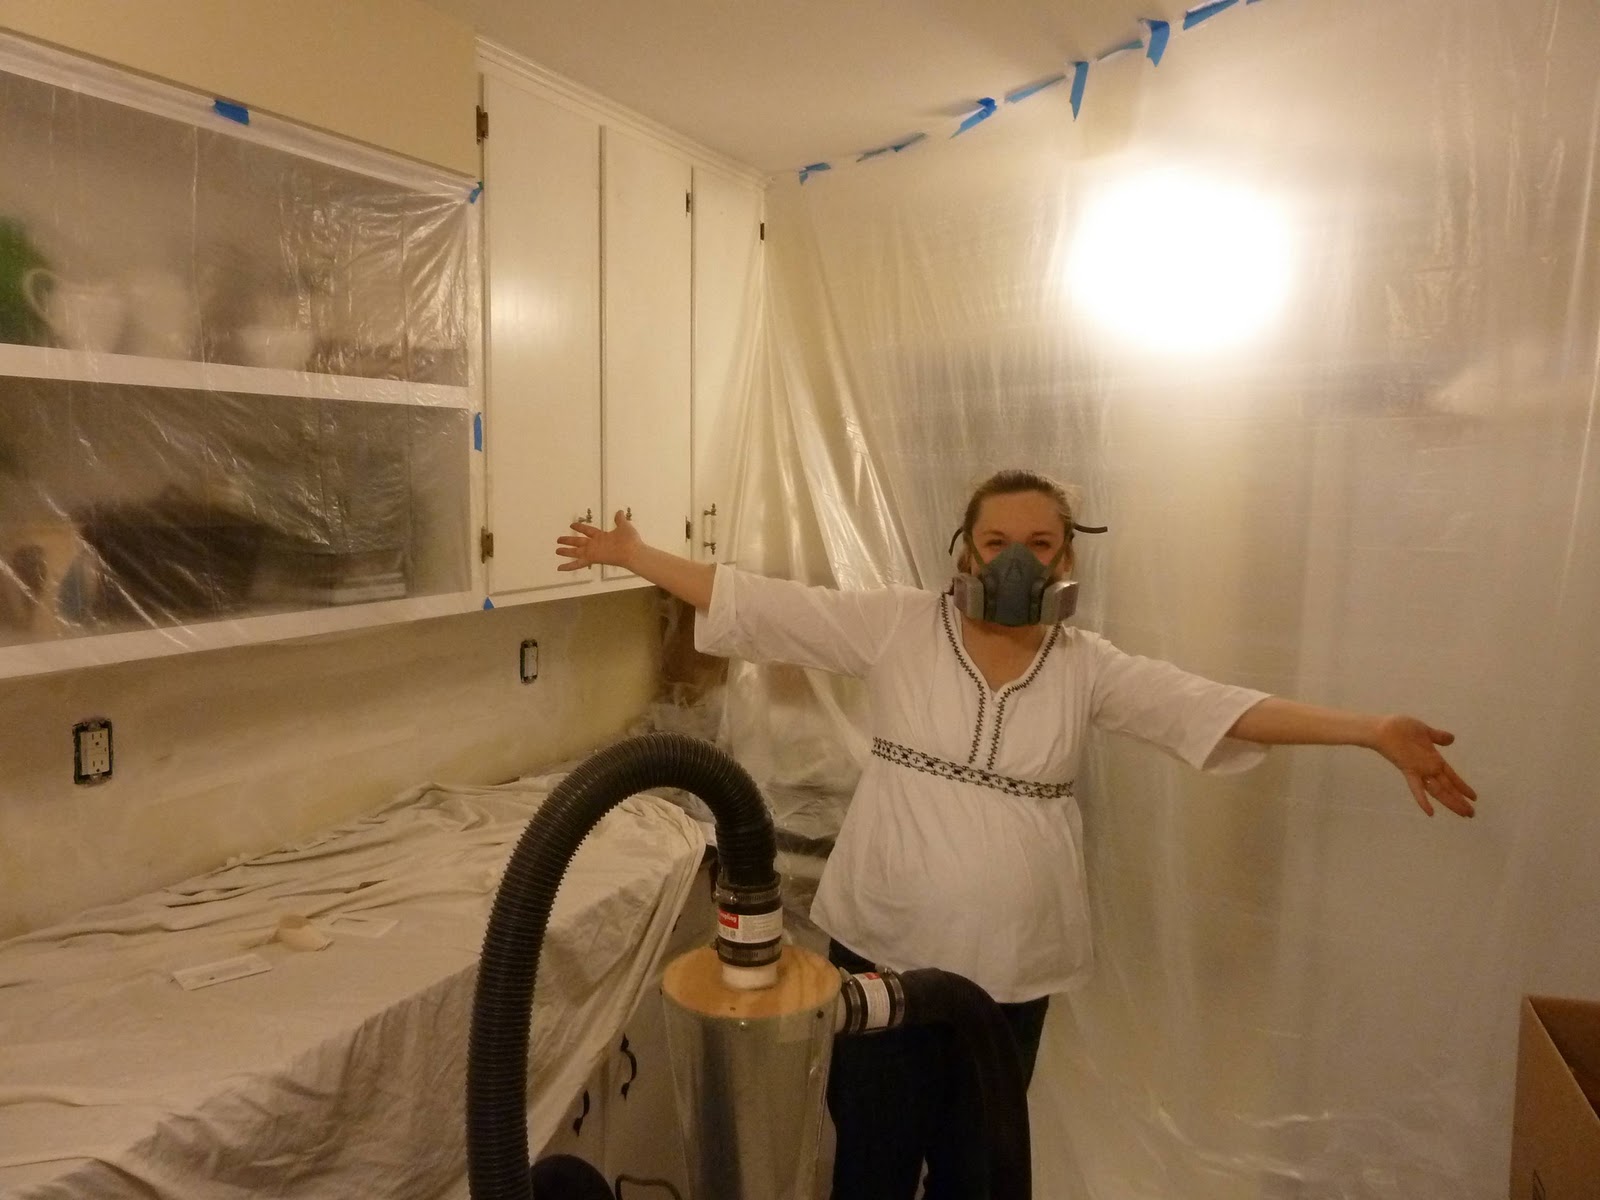
  • Pete built this crazy-cool machine that creates a vortex cone to trap particles (like dust from sanding) and uses a shop vac to power it.
  • Sanded cabinets, sanded walls, sanded floor, sanded trim
  • Added an additional two receptacles to keep the house to code
  • Repaired, re-puttyed and sanded the walls.
  • Built new counter tops from plywood and added supports to a 12 inch overhang so we could still have a small eat-in bar type area.
  • Made backsplash boards for all the counters.
  • Covered or recovered all the counter tops with new laminate.
  • Everyone in our family spend time painting (I was painting cabinet doors while going into labor, and while I was in my resting time after birth, my mom, sister, dad, mother-in-law and who know who all else were painting second coats of paint.
  • Installed new doors on the pantry.
  • Pete and my dad installed a new garbage disposal because the old one suddenly began leaking straight out the side of it.
  • Pete installed a new sink spigot and handles. He wasn't able to do the garbage disposal at the same time because it didn't begin leaking until just a few weeks ago.
  • Attempted to level the floor from underneath the house using floor jacks.  It was a lot of work but unfortunately didn't work and left a few extra cracks in the ceiling.
  • Pete sealed up a portion of the kitchen, wore a tyvex suit and scraped up a section of old floor tiles that were probably asbestos. It was a bout a 6 x 10 area.  He sweated off several pound (not kidding)
  • Installed the new CORK FLOORS!  Yay!
  • Installed new locks on the doors.
  • Installed a new range hood.  Tried painting the old one, but it just looked awful.
  • I painted everything again LOL!  Not really but I went back over the edges, painted the ceiling and painted the additional trim that Pete added.
  • I disassembled the ceiling fans and painted the brass parts a silver brushed satin.
  • I took off the door knobs of the two half doors that go into the kitchen and replaced them with smaller metal pulls.  I also painted the pulls black (they were re-purposed from the doors that used to be in the living room that we took down.
  • Repaired the refrigerator.
  • There was probably not a surface that was not painted, sanded or scraped.  We emptied the massive refrigerator multiple times (for repair, to fix the floor, install the cork, etc).  My dining room was a "holding place" off and on for the whole 20 months we've been working on this.
  • I still need to make curtains and recover the seats on the bar stools.


the counter was only 17" wide to the right of the stove before we added four additional cabinets

Thanks for stopping by!
Love, Carra

Don't forget, tomorrow starts my 31 Day Fall Fun!


Saturday, September 24, 2011

Montage of Kitchen Progress to the REVEAL!

First four pictures are of how the kitchen was when we bought the house.  The rest...memorable moments from the last (almost) two years of renovations.


Next...the REVEAL!

Love, Carra

Friday, September 2, 2011

Natural renovations... a reflection of life

I know it's a little 80's... but don't ya see the potential? Pete's not so sure either. Right now campus stuff is just intense and very mentally & physically time-consuming. I think my desire the have a completion point draws me back to the bucket of paint.
What I am so excited about what God has allowed us to do with our lives is invest in college students. It is a privilege (and a rush) to see lives transformed by the true Christ.
Most of my energy is spent handling behind-the scenes things; with Pete in a much expanded leadership role..."behind the scenes" is for a much bigger stage.
So what is it about random ugly pieces of furniture that draws me in?
1. I love watching something beautiful come about.
2. Unlike ministry, there is an end-point. Spiritual growth is unpredictable. But black paint will create black furniture. This provides balance in my life LOL!
3. It reminds me that perfection isn't everything. Each piece I redo has some "uniqueness." So far, I haven't found knobs I like and the thing no longer wants to shut all the way. I'll mess with it more later; see if I can remedy that.
Hope you enjoy a wonderful Labor Day!
Love Carra

Friday, August 19, 2011

Chair Renovation

So while Pete has been upstairs making the kitchen look lovely, I've been working on a project that will hopefully improve our dark den.
Here is one of two IKEA chairs that I bought off craiglist for $20 total. They were in pretty bad shape (as you can see in the blue chair picture). They are only about $79 each new but I would rather save the $160, select the fabric I want and see how I would do in redoing a chair.
So the fabric I found on fabric.com (and got 15% off and 2% cash back from ebates) for about $25. I have enough for both chairs (I've only sewn one chair cover so far) and two throw pillows.
I spend a lot of time in our den (which is also homeschool room, student training room, staff meeting room, workout space, computer lab and game room (well, a shelf full of board games and a foosball table) - as well as a bedroom when my family visits and ironing room for the extremely rare occassions I actually iron something. So I want to have a functional space, but I have longed for a pretty space too. These chairs are another step in that direction.
Next step, a coat of all natural paint for these walls! But that's a post for another day ;)
Love, Carra

My Cork Floors!!!

Right now even as I type this, my awesome husband is installing our new cork (yes, I said cork!) floors in the kitchen. We pretty much returned from Colorado, took a weekend trip 6 hrs away to Gatlinburg to celebrate a family birthday, hosted a three day staff planning time, took 22 students from UNC Greensboro to train them how to share about Christ and lead Bible studies --- all in two weeks!!!
So amid and amidst all that, pete scraped up the older flooring & began laying the new flooring.I currently have a refrigerator but no stove yet back in place. Can't wait to share the "after" pictures!
Love, Carrra

Thursday, December 23, 2010

Like a Watched Pot Belly (and Kitchen Update)

Guess what!  I'm not in labor.  I've been "practicing" a lot.  I'm not sure who to blame - me or the baby - but there was a lot of practice contractions all night long.  I promised a kitchen update earlier, but decided to use the time to have a little more fun with my girls before my "lying in" time.

  • Since I was not in labor on Monday, I did a ton of house-cleaning & had/helped girls clean the playroom. That night I was up at 1:00 a.m. scrubbing the bathroom floor.
  • Since I was not in labor on Tuesday, I decided to bake Christmas cookies.  That night we took some to our neighbors & sang a few carols (well one carol - Jingle Bells - several times)
  • Since I was not in labor on Wednesday, I decided to make a meal plan and go grocery shopping. That night I completed an embroidery project for the baby's quilt.
  • Since I'm not in labor today, we are headed to the zoo and museum.
But before I leave, I wanted to show several pictures of the kitchen renovation. 

When we bought the house, there was approximately 17 inches of counter space to the right of the stove. Most of this whole kitchen renovation has been to expand counter and storage while still having a small eat-in area.

Orientation: The stove is still in the same place. The refrigerator was moved to the opposite wall.

New counter tops. By the way, we didn't purchase laminate counter tops, Pete purchased the thin board and then cut and glued and routed, leveled and basically created counter tops.  I'm pretty impressed.

This photo was taken this past weekend.  Oh and you might want to check back with the oldest photos to get the full feel of the transformation of the kitchen.
Last Christmas it looked like this.


 Because of the age of the house, there is a huge likelihood of lead paint.  In addition to completing the counter tops, Pete chiseled the old "what color is this?" ceramic tile off the back splash so I could paint.  Then he smoothed the uneven places and damaged spots with putty, then sanded it down evenly.  To protect me, the girls and the baby, he rigged up some major plastic sheeting.  I reminds me of a scene from ET.

I was allowed to come take a peek at the progress...with the proper safety equipment of course.  :-)


Ta-da!  We'll be changing out the hardware and freshing the white on the cabinets.  And not to forget - the cork floor - yay!

Still quite a project - Pete is building a new cabinet for over the fridge and there are some floor evenness issues that have to be resolved before the cork can go in.  And the old cabinets that are seen here on the bottom right - Pete will be making new door faces so that all of them will match the original kitchen.

Hope to have some baby news soon!

Love, Carra

Thursday, August 26, 2010

Like a kid in an organic candy store!

Last week, we drove to Durham to Common Ground Green Building Supply to buy some truly non-toxic paint (see previous post on my disappointment about our "zero-VOC" paint).

I had a blast! Everything in the store is non-toxic, non-off gassing, natural and green. I could walk on cork floors (and they are every bit as awesome as I was hoping), see all the fun colors of the marmoleum flooring (alternative to linoleum floor tiles) and browse paint samples to my heart's delight. (They even had a few mistints, but I didn't succumb).


Not only did we buy paint, but we found some really great (pretty cost-effective) options for the continued kitchen renovation. I won't tell you all right now, but cork floors might really be in my future :-) See we love them already!

Love,

Wrapping Mattress (DIY)

Please see my previous posts on preventing SIDS

One aside before the DIY:
Don't be mislead!
My SIDS soapbox is not about "cheap" mattresses that off-gas. The
mattresses (even those with special covers and toppers) are treated with flame retardant chemicals. So even though someone says - "Oh I got a good mattress - no worries," it does not matter. The only safe options (unwrapped) are going to be natural latex (like from savvy rest) or an organic cotton mattress. Even if the mattress you buy says "Eco, Soy, Plant Derived or Bio" it is often still a polyurethane foam (mixed with some healthy stuff). Just watch closely for PVC vinyl wrapped mattresses. Bad and often not disclosed. ----------------------------------------
As promised, here are pictures and instructions for wrapping your mattresses. We just graduated Faith up to a "big girl" bed. Since we aren't in a position to purchase the natural latex mattresses for the girls, we made sure their beds are wrapped.

1. You can purchase the wraps already cut to size or purchase a roll of 6 mil clear plastic sheeting (not PVC or Polyurethane) and cut enough to completely cover the mattress with overlap.

2. You want to wrap the mattress like a gift so that all of the seams are on the bottom (whichever you determine is the bottom). Clear tape is the ideal. This is semi-clear packing tape I'm using.

3. Ironically, you now need to cut a few vent holes in the plastic on the underside of the mattress. We want to stop the off-gassing the mattress, but it still needs a minimum amount of ventilation. The jagged holes prove I'm not a perfectionist (LOL)! It's going to be on bottom anyway.

4. Now you make the bed! Make sure vent holes are down and all seams are thoroughly taped shut. I have a wool blanket and an all cotton mattress cover then the fitted sheet. It makes the bed a little softer. It also cuts down on the "crinkly" sound that is an unavoidable result of the wrapped mattress.

Happy Wrapping!

Love,

Wednesday, August 4, 2010

Oh for the want of a healthy home...

My sweet husband made a discovery this week. He just finished this AWESOME computer desk for me and the girls. I'll share a picture very soon (I'm re-working the whole den and I just drug a futon in front of it. So it is not picture-ready yet. :-)

So back to the discovery - I have been loving the ability to redo furniture with zero-VOC paint I can get at Lowes (Olympic). So Pete is researching a safe stain for the top of this table. The wood grain is so lovely, neither of us have the heart to paint over it. So in his research, he finds a site that is pretty critical of zero-VOC paints. [Here it is.]

Not to be swayed by one site (and a site that sells paint), we pressed on. Pete contacted Olympic directly and asked for their MSDS sheets (a government required detail of the ingredients of products). Indeed, the chemicals were present. He even spoke to a representative who was very nice, but stated, "We cannot guarantee that these chemicals are not present in the paint - it is a part of the processing the product." Honesty - that was cool.

Unfortunately that left me feeling a little "creatively inhibited." As you see in the photo, I have projects waiting for some colorful expression. I mean, I'm pregnant after all and this nesting thing is very, very real.

But again Pete brings me back. He reminded me of our choices. We spend less money on movies (aside: we went to see Toy Story 3 yesterday, but I had two free tickets. Before TS3, I think it has been maybe 2 years since we saw one?).

But life is about choices. Pete reminded me that we can choose to spend money on more expensive (truly non-toxic) paint so I can continue to nest and create. We'll just adjust other areas. I appreciate that ;-) So what kind of paint are we headed for? Don't know quite yet. We're still researching the best alternative.

Also - We'll be doing some mattress wrapping in the next week. I'm excited to share the pictures and how it all went. If you missed my last post, definitely read it and share it with your pregnant friends ;-)

Love,

Thursday, July 15, 2010

Kitchen Update

Wanna see the kitchen? It's not done, but its closer!!!

Here are a few pictures of the kitchen at the moment. I know we began this project in November but a lot has happened in our family since then AND we (meaning Pete) is doing this pretty much solo.
The great thing is that it is quite functional. If I didn't have a sink or not enough space to put my gear or food - that
would definitely be a problem. Even though I doubt the "plywood counter top" trend will catch on, I am already super pleased with the footprint of the room. This has essentially doubled my counter space and provided for "hidden" trashcan & recycle bin. Right now, Pete is building a cabinet! That is a pretty major project. I'll post pics once he gets a further along. This is a "weekend warrior" project but a major kitchen renovation never happens in a weekend. We're still committed to doing this both economically (see previous posts on the costs) and naturally. We're now considering bamboo flooring. We were considering ceramic tile for its non-toxic properties and cost. But visiting the beach with Pete's family last week ruled that one out. It is very hard & tiring to stand on for any length of time. We also ruled out cork because we would have to put a lot of sealant on it to make it last in the kitchen. And we aren't willing to compromise on the off-gasing chemicals. So our choices are becoming narrower and narrower LOL. We'll see what we end up with! Thanks for stopping by!

Love,


Wednesday, June 23, 2010

Out of Hiding...

Wow, it has been over a month since I last posted. Sorry I have left you un-blogged for so long. To catch you us on my life right now, let me share a few pieces of my world and what's been going on...

1. I'm pregnant again - that would be the number one reason I haven't blogged. I typically have challenging pregnancies (lots of nausea) and then my iron levels drop and I have headaches and lethargy.

2. The pregnancy is at 14 weeks today. My first miscarriage was one year ago this month and I also had a miscarriage in January. I have struggled to hold my baby in an open hand. And though I have heard the heartbeat and past the milestone 12 weeks - I know that there are no guarantees. In some ways I have held my breath waiting for the confirmations. I think I kept this pregnancy so private is that if we did miscarry... I just didn't want to have to say that again. We even kept the news from our families until was saw a heartbeat on sonogram.

3. This is a very rare summer that we are not traveling. Every summer we are assigned to either take seminary classes (we have a total of 11 required as a part of our work with Campus Crusade for Christ) or to help lead a student summer mission project. Since we were due July 31, Pete was assigned to be here at home and coach new staff interns and those going on one year mission trips. Since there's more flexibility in our summer schedule, our goal is to complete the kitchen renovation.

So I'm feeling better (albeit tired) and my grand intention is to blog more regularly (at least as regularly as I used to LOL). Upcoming topics:
  • Preparing for a Home Birth (I'm going to let you in on my midwife appointments, health issues and preparations)
  • Kitchen Renovation (and some other renovations I'm working on) - we're trying to go as healthy green as possible in this reno so I'll share as we go along
  • Catch you up on some more wild things I'm learning about in Nourishing Traditions and otherwise.
I look forward to spending more time sharing with you my friends. And in the meantime, does anyone have any good beef liver recipes with do not involve onions?

Love,

Tuesday, April 13, 2010

Inexpensive Zero VOC Paint

Ultimate Blog Party 2010

May I introduce myself. I'm Carra and I love "the old ways" as long as they are natural. I'm practicing homeschooling (getting ready for fall), planning a garden for the first time (we've been renting until just last November) and always trying to learn about new ways to care for my family using natural medicine, green cleaners and anything I can discover to promote health and improve the quality of life for my family. I love God extremely much. If you're on a natural journey like me, let me know!

----------------------------

Did you know that Lowe's Home Improvement is my favorite place for paint? Their store brand Olympic was low VOC before "low VOC" was cool.

My favorite area of the store? That shelf.... Tucked away near the paint counter in a "not too noticeable place." What can you find? Mistints! Even the zero VOC Olympic paint gets placed there. My favorite day to visit is Mondays. They seem to have a good selection then.

Completed Zero VOC "Green" Paint Projects:
  • Painted the trim on the window and one entire wall in the loft playroom. - $5.00
  • Painted walls in the loft playroom from aqua to a calm tattered sail - free (leftover paint)
  • Painted all bathrooms a nice neutral light gray (I like to change out bathroom decor frequently so I don't like to make commitments to wall color - free (more leftover paint)
  • Painted the lovely moss/sage/clover (hope to be baby room again) whole room - $5.00
  • Splurged on full price paint for the Irish Lace in the girl's room - $25

Plans:
  • Paint exterior doors (not zero VOC, b/c strong paint needed) - dark taupe - $5.00 (have it)
  • Paint hallway in basement (bought two similar cream colors - plan to pour both in a bucket, mix them up and have one uniform color for the space). - $5.00
  • Paint dresser that I purchased from Salvation Army Thrift Store (my favorite!) dark pink - $2.50

Wow, what a list. We moved October 31st and we have several family difficulties and losses. But on the whole, I feel pretty good about the accomplishments.

Here's the den door before I went all "mistint:"


And here is the after photo. I enjoy what a little paint can do! May all your "before and afters" be naturally healthy ones!

Love,